Posted by James Forshaw, Project Zero
Previously I presented a technique to exploit arbitrary directory creation vulnerabilities on Windows to give you read access to any file on the system. In the upcoming Spring Creators Update (RS4) the abuse of mount points to link to files as I exploited in the previous blog post has been remediated. This is an example of a long term security benefit from detailing how vulnerabilities might be exploited, giving a developer an incentive to find ways of mitigating the exploitation vector.
Keeping with that spirit in this blog post I’ll introduce a novel technique to exploit the more common case of arbitrary file writes on Windows 10. Perhaps once again Microsoft might be able to harden the OS to make it more difficult to exploit these types of vulnerabilities. I’ll demonstrate exploitation by describing in detail the recently fixed issue that Project Zero reported to Microsoft (issue 1428).
An arbitrary file write vulnerability is where a user can create or modify a file in a location they could not normally access. This might be due to a privileged service incorrectly sanitizing information passed by the user or due to a symbolic link planting attack where the user can write a link into a location which is subsequently used by the privileged service. The ideal vulnerability is one where the attacking user not only controls the location of the file being written but also the entire contents. This is the type of vulnerability we’ll consider in this blog post.
A common way of exploiting arbitrary file writes is to perform DLL hijacking. When a Windows executable begins executing the initial loader in NTDLL will attempt to find all imported DLLs. The locations that the loader checks for imported DLLs are more complex than you’d expect but for our purposes can be summarized as follows:
- Check Known DLLs, which is a pre-cached list of DLLs which are known to the OS. If found, the DLL is mapped into memory from a pre-loaded section object.
- Check the application’s directory, for example if importing TEST.DLL and the application is in C:\APP then it will check C:\APP\TEST.DLL.
- Check the system locations, such as C:\WINDOWS\SYSTEM32 and C:\WINDOWS.
- If all else fails search the current environment PATH.
The aim of the DLL hijack is to find an executable which runs at a high privilege which will load a DLL from a location that the vulnerability allows us to write to. The hijack only succeeds if the DLL hasn’t already been found in a location checked earlier.
There are two problems which make DLL hijacking annoying:
- You typically need to create a new instance of a privileged process as the majority of DLL imports are resolved when the process is first executed.
- Most system binaries, executables and DLLs that will run as a privileged user will be installed into SYSTEM32.
The second problem means that in steps 2 and 3 the loader will always look for DLLs in SYSTEM32. Assuming that overwriting a DLL isn’t likely to be an option (at the least if the DLL is already loaded you can’t write to the file), that makes it harder to find a suitable DLL to hijack. A typical way around these problems is to pick an executable that is not located in SYSTEM32 and which can be easily activated, such as by loading a COM server or running a scheduled task.
Even if you find a suitable target executable to DLL hijack the implementation can be quite ugly. Sometimes you need to implement stub exports for the original DLL, otherwise the loading of the DLL will fail. In other cases the best place to run code is during DllMain, which introduces other problems such as running code inside the loader lock. What would be nice is a privileged service that will just load an arbitrary DLL for us, no hijacking, no needing to spawn the “correct” privileged process. The question is, does such a service exist?
It turns out yes one does, and the service itself has been abused at least twice previously, once by Lokihardt for a sandbox escape, and once by me for user to system EoP. This service goes by the name “Microsoft (R) Diagnostics Hub Standard Collector Service,” but we’ll call it DiagHub for short.
The DiagHub service was introduced in Windows 10, although there’s a service that performs a similar task called IE ETW Collector in Windows 7 and 8.1. The purpose of the service is to collect diagnostic information using Event Tracing for Windows (ETW) on behalf of sandboxed applications, specifically Edge and Internet Explorer. One of its interesting features is that it can be configured to load an arbitrary DLL from the SYSTEM32 directory, which is the exact feature that Lokihardt and I exploited to gain elevated privileges. All the functionality for the service is exposed over a registered DCOM object, so in order to load our DLL we’ll need to work out how to call methods on that DCOM object. At this point you can skip to the end but if you want to understand how I would go about finding how the DCOM object is implemented, the next section might be of interest.
Reverse Engineering a DCOM Object
Let’s go through the steps I would take to try and find what interfaces an unknown DCOM object supports and find the implementation so we can reverse engineer them. There are two approaches I will typically take, go straight for RE in IDA Pro or similar, or do some on-system inspection first to narrow down the areas we have to investigate. Here we’ll go for the second approach as it’s more informative. I can’t say how Lokihardt found his issue; I’m going to opt for magic.
For this approach we’ll need some tools, specifically my OleViewDotNet v1.4+ (OVDN) tool from github as well as an installation of WinDBG from the SDK. The first step is to find the registration information for the DCOM object and discover what interfaces are accessible. We know that the DCOM object is hosted in a service so once you’ve loaded OVDN go to the menu Registry ⇒ Local Services and the tool will load a list of registered system services which expose COM objects. If you now find the “Microsoft (R) Diagnostics Hub Standard Collector Service” service (applying a filter here is helpful) you should find the entry in the list. If you open the service tree node you’ll see a child, “Diagnostics Hub Standard Collector Service,” which is the hosted DCOM object. If you open that tree node the tool will create the object, then query for all remotely accessible COM interfaces to give you a list of interfaces the object supports. I’ve shown this in the screenshot below:

While we’re here it’s useful to inspect what security is required to access the DCOM object. If you right click the class treenode you can select View Access Permissions or View Launch Permissions and you’ll get a window that shows the permissions. In this case it shows that this DCOM object will be accessible from IE Protected Mode as well as Edge’s AppContainer sandbox, including LPAC.

Of the list of interfaces shown we only really care about the standard interfaces. Sometimes there are interesting interfaces in the factory but in this case there aren’t. Of these standard interfaces there are two we care about, the IStandardCollectorAuthorizationService and IStandardCollectorService. Just to cheat slightly I already know that it’s the IStandardCollectorService service we’re interested in, but as the following process is going to be the same for each of the interfaces it doesn’t matter which one we pick first. If you right click the interface treenode and select Properties you can see a bit of information about the registered interface.

There’s not much more information that will help us here, other than we can see there are 8 methods on this interface. As with a lot of COM registration information, this value might be missing or erroneous, but in this case we’ll assume it’s correct. To understand what the methods are we’ll need to track down the implementation of IStandardCollectorService inside the COM server. This knowledge will allow us to target our RE efforts to the correct binary and the correct methods. Doing this for an in-process COM object is relatively easy as we can query for an object’s VTable pointer directly by dereferencing a few pointers. However, for out-of-process it’s more involved. This is because the actual in-process object you’d call is really a proxy for the remote object, as shown in the following diagram:

All is not lost, however; we can still find the the VTable of the OOP object by extracting the information stored about the object in the server process. Start by right clicking the “Diagnostics Hub Standard Collector Service” object tree node and select Create Instance. This will create a new instance of the COM object as shown below:

The instance gives you basic information such as the CLSID for the object which we’ll need later (in this case {42CBFAA7-A4A7-47BB-B422-BD10E9D02700}) as well as the list of supported interfaces. Now we need to ensure we have a connection to the interface we’re interested in. For that select the IStandardCollectorService interface in the lower list, then in the Operations menu at the bottom select Marshal ⇒ View Properties. If successful you’ll now see the following new view:

There’s a lot of information in this view but the two pieces of most interest are the Process ID of the hosting service and the Interface Pointer Identifier (IPID). In this case the Process ID should be obvious as the service is running in its own process, but this isn’t always the case—sometimes when you create a COM object you’ve no idea which process is actually hosting the COM server so this information is invaluable. The IPID is the unique identifier in the hosting process for the server end of the DCOM object; we can use the Process ID and the IPID in combination to find this server and from that find out the location of the actual VTable implementing the COM methods. It’s worth noting that the maximum Process ID size from the IPID is 16 bits; however, modern versions of Windows can have much larger PIDs so there’s a chance that you’ll have to find the process manually or restart the service multiple times until you get a suitable PID.
Now we’ll use a feature of OVDN which allows us to reach into the memory of the server process and find the IPID information. You can access information about all processes through the main menu Object ⇒ Processes but as we know which process we’re interested in just click the View button next to the Process ID in the marshal view. You do need to be running OVDN as an administrator otherwise you’ll not be able to open the service process. If you’ve not done so already the tool will ask you to configure symbol support as OVDN needs public symbols to find the correct locations in the COM DLLs to parse. You’ll want to use the version of DBGHELP.DLL which comes with WinDBG as that supports remote symbol servers. Configure the symbols similar to the following dialog:

If everything is correctly configured and you’re an administrator you should now see more details about the IPID, as shown below:

The two most useful pieces of information here are the Interface pointer, which is the location of the heap allocated object (in case you want to inspect its state), and the VTable pointer for the interface. The VTable address gives us information for where exactly the COM server implementation is located. As we can see here the VTable is located in a different module (DiagnosticsHub.StandardCollector.Runtime) from the main executable (DiagnosticsHub.StandardCollector.Server). We can verify the VTable address is correct by attaching to the service process using WinDBG and dumping the symbols at the VTable address. We also know from before we’re expecting 8 methods so we can take that into account by using the command:
dqs DiagnosticsHub_StandardCollector_Runtime+0x36C78 L8
Note that WinDBG converts periods in a module name to underscores. If successful you’ll see the something similar to the following screenshot:

Extracting out that information we now get the name of the methods (shown below) as well as the address in the binary. We could set breakpoints and see what gets called during normal operation, or take this information and start the RE process.
ATL::CComObject<StandardCollectorService>::QueryInterface
ATL::CComObjectCached<StandardCollectorService>::AddRef
ATL::CComObjectCached<StandardCollectorService>::Release
StandardCollectorService::CreateSession
StandardCollectorService::GetSession
StandardCollectorService::DestroySession
StandardCollectorService::DestroySessionAsync
StandardCollectorService::AddLifetimeMonitorProcessIdForSession
The list of methods looks correct: they start with the 3 standard methods for a COM object, which in this case are implemented by the ATL library. Following those methods are five implemented by the StandardCollectorService class. Being public symbols, this doesn’t tell us what parameters we expect to pass to the COM server. Due to C++ names containing some type information, IDA Pro might be able to extract that information for you, however that won’t necessarily tell you the format of any structures which might be passed to the function. Fortunately due to how COM proxies are implemented using the Network Data Representation (NDR) interpreter to perform marshalling, it’s possible to reverse the NDR bytecode back into a format we can understand. In this case go back to the original service information, right click the IStandardCollectorService treenode and select View Proxy Definition. This will get OVDN to parse the NDR proxy information and display a new view as shown below.
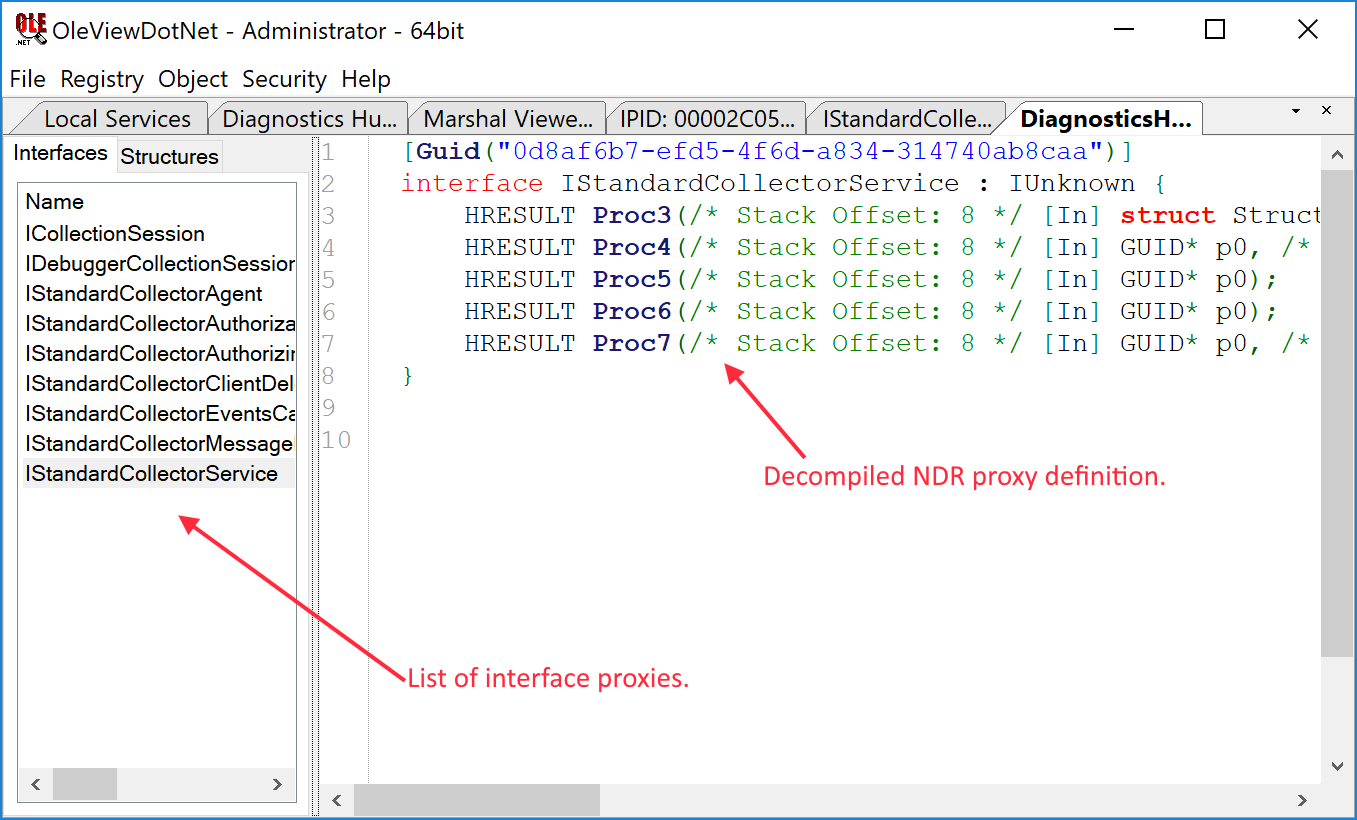
Viewing the proxy definition will also parse out any other interfaces which that proxy library implements. This is likely to be useful for further RE work. The decompiled proxy definition is shown in a C# like pseudo code but it should be easy to convert into working C# or C++ as necessary. Notice that the proxy definition doesn’t contain the names of the methods but we’ve already extracted those out. So applying a bit of cleanup and the method names we get a definition which looks like the following:
[uuid("0d8af6b7-efd5-4f6d-a834-314740ab8caa")]
struct IStandardCollectorService : IUnknown {
HRESULT CreateSession(_In_ struct Struct_24* p0,
_In_ IStandardCollectorClientDelegate* p1,
_Out_ ICollectionSession** p2);
HRESULT GetSession(_In_ GUID* p0, _Out_ ICollectionSession** p1);
HRESULT DestroySession(_In_ GUID* p0);
HRESULT DestroySessionAsync(_In_ GUID* p0);
HRESULT AddLifetimeMonitorProcessIdForSession(_In_ GUID* p0, [In] int p1);
}
There’s one last piece missing; we don’t know the definition of the Struct_24 structure. It’s possible to extract this from the RE process but fortunately in this case we don’t have to. The NDR bytecode must know how to marshal this structure across so OVDN just extracts the structure definition out for us automatically: select the Structures tab and find Struct_24.

As you go through the RE process you can repeat this process as necessary until you understand how everything works. Now let’s get to actually exploiting the DiagHub service and demonstrating its use with a real world exploit.
Example Exploit
So after our efforts of reverse engineering, we’ll discover that in order to to load a DLL from SYSTEM32 we need to do the following steps:
- Create a new Diagnostics Session using IStandardCollectorService::CreateSession.
- Call the ICollectionSession::AddAgent method on the new session, passing the name of the DLL to load (without any path information).
The simplified loading code for ICollectionSession::AddAgent is as follows:
void EtwCollectionSession::AddAgent(LPWCSTR dll_path,
REFGUID guid) {
WCHAR valid_path[MAX_PATH];
if ( !GetValidAgentPath(dll_path, valid_path)) {
return E_INVALID_AGENT_PATH;
HMODULE mod = LoadLibraryExW(valid_path,
nullptr, LOAD_WITH_ALTERED_SEARCH_PATH);
dll_get_class_obj = GetProcAddress(hModule, "DllGetClassObject");
return dll_get_class_obj(guid);
}
We can see that it checks that the agent path is valid and returns a full path (this is where the previous EoP bugs existed, insufficient checks). This path is loading using LoadLibraryEx, then the DLL is queried for the exported method DllGetClassObject which is then called. Therefore to easily get code execution all we need is to implement that method and drop the file into SYSTEM32. The implemented DllGetClassObject will be called outside the loader lock so we can do anything we want. The following code (error handling removed) will be sufficient to load a DLL called dummy.dll.
IStandardCollectorService* service;
CoCreateInstance(CLSID_CollectorService, nullptr, CLSCTX_LOCAL_SERVER, IID_PPV_ARGS(&service));
SessionConfiguration config = {};
config.version = 1;
config.monitor_pid = ::GetCurrentProcessId();
CoCreateGuid(&config.guid);
config.path = ::SysAllocString(L"C:\Dummy");
ICollectionSession* session;
service->CreateSession(&config, nullptr, &session);
GUID agent_guid;
CoCreateGuid(&agent_guid);
session->AddAgent(L"dummy.dll", agent_guid);
All we need now is the arbitrary file write so that we can drop a DLL into SYSTEM32, load it and elevate our privileges. For this I’ll demonstrate using a vulnerability I found in the SvcMoveFileInheritSecurity RPC method in the system Storage Service. This function caught my attention due to its use in an exploit for a vulnerability in ALPC discovered and presented by Clément Rouault & Thomas Imbert at PACSEC 2017. While this method was just a useful exploit primitive for the vulnerability I realized it has not one, but two actual vulnerabilities lurking in it (at least from a normal user privilege). The code prior to any fixes for SvcMoveFileInheritSecurity looked like the following:
void SvcMoveFileInheritSecurity(LPCWSTR lpExistingFileName,
LPCWSTR lpNewFileName,
DWORD dwFlags) {
PACL pAcl;
if (!RpcImpersonateClient()) {
// Move file while impersonating.
if (MoveFileEx(lpExistingFileName, lpNewFileName, dwFlags)) {
RpcRevertToSelf();
// Copy inherited DACL while not.
InitializeAcl(&pAcl, 8, ACL_REVISION);
DWORD status = SetNamedSecurityInfo(lpNewFileName, SE_FILE_OBJECT,
UNPROTECTED_DACL_SECURITY_INFORMATION | DACL_SECURITY_INFORMATION,
nullptr, nullptr, &pAcl, nullptr);
if (status != ERROR_SUCCESS)
MoveFileEx(lpNewFileName, lpExistingFileName, dwFlags);
}
else {
// Copy file instead...
RpcRevertToSelf();
}
}
}
The purpose of this method seems to be to move a file then apply any inherited ACE’s to the DACL from the new directory location. This would be necessary as when a file is moved on the same volume, the old filename is unlinked and the file is linked to the new location. However, the new file will maintain the security assigned from its original location. Inherited ACEs are only applied when a new file is created in a directory, or as in this case, the ACEs are explicitly applied by calling a function such as SetNamedSecurityInfo.
To ensure this method doesn’t allow anyone to move an arbitrary file while running as the service’s user, which in this case is Local System, the RPC caller is impersonated. The trouble starts immediately after the first call to MoveFileEx, the impersonation is reverted and SetNamedSecurityInfo is called. If that call fails then the code calls MoveFileEx again to try and revert the original move operation. This is the first vulnerability; it’s possible that the original filename location now points somewhere else, such as through the abuse of symbolic links. It’s pretty easy to cause SetNamedSecurityInfo to fail, just add a Deny ACL for Local System to the file’s ACE for WRITE_DAC and it’ll return an error which causes the revert and you get an arbitrary file creation. This was reported as issue 1427.
This is not in fact the vulnerability we’ll be exploiting, as that would be too easy. Instead we’ll exploit a second vulnerability in the same code: the fact that we can get the service to call SetNamedSecurityInfo on any file we like while running as Local System. This can be achieved either by abusing the impersonated device map to redirect the local drive letter (such as C:) when doing the initial MoveFileEx, which then results in lpNewFileName pointing to an arbitrary location, or more interestingly abusing hard links. This was reported as issue 1428. We can exploit this using hard links as follows:

- Create a hard link to a target file in SYSTEM32 that we want to overwrite. We can do this as you don’t need to have write privileges to a file to create a hard link to it, at least outside of a sandbox.
- Create a new directory location that has an inheritable ACE for a group such as Everyone or Authenticated Users to allow for modification of any new file. You don’t even typically need to do this explicitly; for example, any new directory created in the root of the C: drive has an inherited ACE for Authenticated Users. Then a request can be made to the RPC service to move the hardlinked file to the new directory location. The move succeeds under impersonation as long as we have FILE_DELETE_CHILD access to the original location and FILE_ADD_FILE in the new location, which we can arrange.
- The service will now call SetNamedSecurityInfo on the moved hardlink file. SetNamedSecurityInfo will pick up the inherited ACEs from the new directory location and apply them to the hardlinked file. The reason the ACEs are applied to the hardlinked file is from the perspective of SetNamedSecurityInfo the hardlinked file is in the new location, even though the original target file we linked to was in SYSTEM32.
By exploiting this we can modify the security of any file that Local System can access for WRITE_DAC access. Therefore we can modify a file in SYSTEM32, then use the DiagHub service to load it. There is a slight problem, however. The majority of files in SYSTEM32 are actually owned by the TrustedInstaller group and so cannot be modified, even by Local System. We need to find a file we can write to which isn’t owned by TrustedInstaller. Also we’d want to pick a file that won’t cause the OS install to become corrupt. We don’t care about the file’s extension as AddAgent only checks that the file exists and loads it with LoadLibraryEx. There are a number of ways we can find a suitable file, such as using the SysInternals AccessChk utility, but to be 100% certain that the Storage Service’s token can modify the file we’ll use my NtObjectManager PowerShell module (specifically its Get-AccessibleFile cmdlet, which accepts a process to do the access check from). While the module was designed for checking accessible files from a sandbox, it also works to check for files accessible by privileged services. If you run the following script as an administrator with the module installed the $files variable will contain a list of files that the Storage Service has WRITE_DAC access to.
Import-Module NtObjectManager
Start-Service -Name "StorSvc"
Set-NtTokenPrivilege SeDebugPrivilege | Out-Null
$files = Use-NtObject($p = Get-NtProcess -ServiceName "StorSvc") {
Get-AccessibleFile -Win32Path C:\Windows\system32 -Recurse `
-MaxDepth 1 -FormatWin32Path -AccessRights WriteDac -CheckMode FilesOnly
}
Start-Service -Name "StorSvc"
Set-NtTokenPrivilege SeDebugPrivilege | Out-Null
$files = Use-NtObject($p = Get-NtProcess -ServiceName "StorSvc") {
Get-AccessibleFile -Win32Path C:\Windows\system32 -Recurse `
-MaxDepth 1 -FormatWin32Path -AccessRights WriteDac -CheckMode FilesOnly
}
Looking through the list of files I decided to pick on the file license.rtf, which contains a short license statement for Windows. The advantage of this file is it’s very likely to be not be critical to the operation of the system and so overwriting it shouldn’t cause the installation to become corrupted.

So putting it all together:
- Use the Storage Service vulnerability to change the security of the license.rtf file inside SYSTEM32.
- Copy a DLL, which implements DllGetClassObject over the license.rtf file.
- Use the DiagHub service to load our modified license file as a DLL, get code execution as Local System and do whatever we want.
If you’re interested in seeing a fully working example, I’ve uploaded a full exploit to the original issue on the tracker.
Wrapping Up
In this blog post I’ve described a useful exploit primitive for Windows 10, which you can even use from some sandboxed environments such as Edge LPAC. Finding these sorts of primitives makes exploitation much simpler and less error-prone. Also I’ve given you a taste of how you can go about finding your own bugs in similar DCOM implementations.
No comments:
Post a Comment